Image SEO is the process of optimizing your website images for search engines to drive more organic traffic and improve rankings.
And it matters more than most people think.
Blog posts with good images attract 94% more views than posts with no images.
Images don’t just make your pages look better; they improve
- Overall website engagement
- User experience and
- Search visibility
No matter your niche, properly optimized images can help you attract more clicks, rank higher on Google, and bring in free traffic.
In this guide, you’ll learn how to optimize your images step by step for better SEO and better results. Let’s dive in.
Table of Contents
What is Image SEO (and Why It Matters More Than Ever)

Image SEO is simply about optimizing your images so search engines like Google can understand and rank them.
This includes improving elements such as alt text, file names, titles, captions, and other image attributes so your images can appear in Google Image Search and drive extra traffic from multiple keywords.
When done right, image optimization is a powerful SEO strategy for increasing visibility in search engines.
How to Optimize Images for SEO In 2026? 8 Simple Tips That Work
32.9% of Google search results include images, making image optimization essential for better visibility. That’s a lot of search traffic you can’t afford to ignore.
Image optimization isn’t optional in 2026. It requires optimizing several key elements. Here’s a list of some of the most critical factors of optimizing images for SEO.
- Choose the proper image format
- Optimize image file names
- Write descriptive alt text
- Add clear image titles and captions
- Use a CDN to deliver images faster
- Create XML image sitemaps
- Use responsive images for all devices
Let’s talk about each one of the above-mentioned factors of images, so you will know how to easily optimize an image for SEO.
1. Choose the Right Image File Type
Choosing the right image file type is the first step in image SEO.
There are many image formats, such as WebP, JPEG, PNG, and GIF. Each one has different uses.
Google recommends the WebP image format because it’s much smaller without sacrificing quality.
Lossless WebP files are about 26% smaller than PNGs, and lossy WebP images are 25–34% smaller than similar JPEGs, helping your pages load faster.
Picking the right format keeps your site fast and user-friendly. Here are some best practices.
- WebP is the best format for almost everything (photos, blog images, products). They’re smaller in size and have the same quality, so the site loads faster. Use this image file type by default. Use free plugins like Converter for Media to convert files in standard JPEG, PNG and GIF formats with WebP and AVIF formats.
- Use JPEG format as a backup option if WebP isn’t supported. They offer good quality but are larger than WebP.
- You can use GIFs for thumbnails and animations. For instance, if you want to show an automated sequence of multiple images, you can create a GIF to make it appealing, but GIFs tend to be very large, so use them only when absolutely necessary.
- PNG format is recommended only for logos, icons, or transparent backgrounds. They look sharp but are often heavy files.
2. Use SEO-Friendly Image File Names
Your image file name matters for SEO. Don’t upload images with random names like DSC02512.png, as search engines can’t understand what that means.
Instead, rename every image before uploading. Use descriptive words that explain the content, like image-seo-checklist.jpg or healthy-chicken-meal-prep.webp. This helps both Google and users understand the image.
Always use hyphens (-) between words, not underscores (_). Google reads hyphens as spaces but often joins words with underscores.
Keep it simple: use relevant keywords, short names, and avoid random numbers.
3. Write Descriptive Alt Text
Image alt text is extremely important, and you must optimize your images with clear alt text to improve organic search results.
Alt text helps search engines understand what your image is about. Without it, Google sees your image as empty.
Here’s what it looks like from the WordPress dashboard.

When using image alt text SEO, use 4 to 5 words for better results in search engines like Google.
Keep it short, around 4–6 words works well. For example, instead of writing “SEO” or “tips,” use something clearer like “best Pinterest SEO tips.”
4. Add Better Image Titles and Captions
Image titles and captions add more context to your images. They help both users and search engines understand what the image is about.
We recommend creating an image title that’s easy to read and including a keyword phrase to better optimize images for search engines like Google. Don’t use random titles or default file names for your images.
Captions are especially useful because visitors can actually read them. A short and clear caption can explain the image, add meaning, and keep people engaged with your content.
If you’re using WordPress, you can easily create or add a caption to your images. Once the image is uploaded to your WordPress media library, you can enter its details, such as title, alt text, and a caption.
Here’s what it looks like;

Once you add the caption and alt text, simply click on the ‘Insert into post’ button to add the image to your posts.
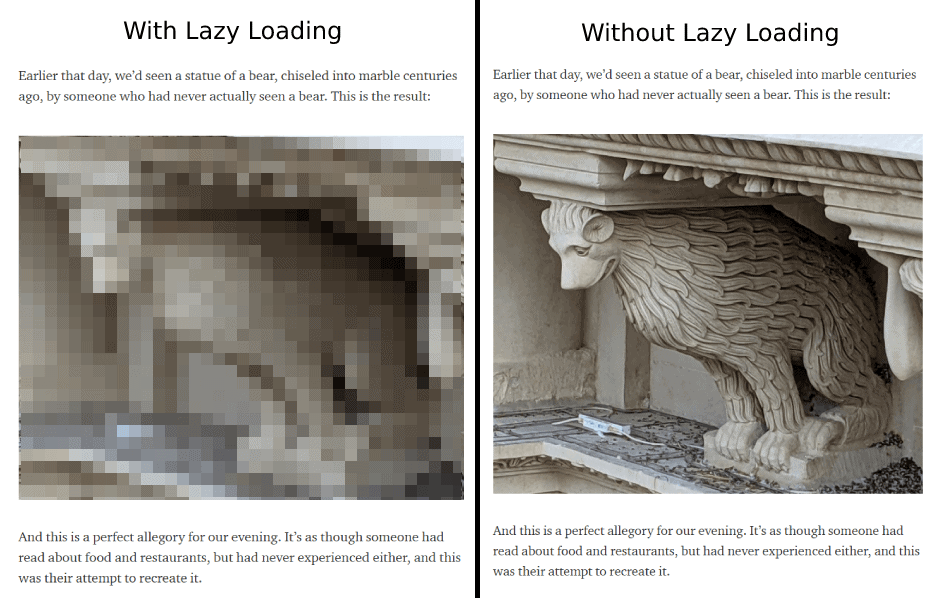
5. Enable Lazy Loading for Better Performance
Lazy loading helps your site load faster by loading images only when they’re about to appear on the screen.
The whole purpose of lazy loading is to load images as users scroll, rather than loading them all at once. This saves users a lot of time, ultimately helping you with faster page load times.
Lazy loading doesn’t make images smaller or load faster on its own.
It simply waits to load each image until it appears on the user’s screen, instead of loading everything at once.
You can use plugins like a3 Lazy Load to implement it quickly without touching any code.
6. Use a CDN to Host Your Images
One of the best ways to improve your website’s overall page load times is to host your images on a CDN.
A CDN (Content Delivery Network) is a system of distributed servers that deliver pages and other content, such as videos and images, to users based on their geographic location.
There are several CDN options, including CloudFlare (free) and MaxCDN (premium, offering more features). If you’re using hosting platforms like Bluehost, they offer CloudFlare integration by default, so you can easily integrate your websites with CloudFlare CDN from the control panel.

If you’re wondering about why you should use a CDN to host your images, here are a few of the biggest benefits.
- Faster loading times (the #1 reason to use image CDN is your images are hosted elsewhere, not on your own hosting servers, which means you’re not affecting your page loading times)
- Reduces the burden on your hosting (you’re not affecting your website hosting server performance at all by hosting your images on a CDN)
- Better security (it’s almost impossible to perform security attacks such as DDoS attacks through a CDN network!)
- Saves time (most of the time, you don’t even need to shrink and optimize your image sizes, which ultimately saves your time without compromising on your image quality)
7. Add Images to Your Sitemap
Want Google to find more of your images? Add them to your sitemap.
An image sitemap helps search engines discover, crawl, and index your images faster.
So how can you create XML sitemaps for images?
For all WordPress sites, this can be done with a WordPress plugin like Rank Math, which automatically creates and manages image sitemaps.

This plugin automatically creates the sitemap for images uploaded to your WordPress dashboard.
If you’re not using WordPress, there are several free online tools, such as My Sitemap Generator, that can crawl your site and generate a sitemap.
8. Use Responsive Image Scaling
Your images should look good and load fast on every device.
Not everyone uses a laptop or desktop to browse the internet. Mobile internet usage has increased exponentially. That’s why you need to make sure all your images load properly on all devices.
Responsive image scaling means serving the right image size based on the user’s screen. Smaller images for mobile, larger ones for desktops.
Here’s what you can do:
- Use responsive image sizes
- Compress images before uploading (use tools like ShortPixel, TinyPNG, or Imagify)
- Use modern formats like WebP or AVIF
- Avoid uploading huge 3000px images when 800px is enough
- Enable lazy loading
If you want to make your images responsive and adapt them to all kinds of devices, including smartphones, laptops, tablets, and more, you can either use responsive web design or add simple code to your theme file to make responsive images.
Here’s how you can do it.
Here’s the tag to use whenever you add an image to your posts or pages to make them responsive.
<img src=”nature.jpg” alt=”Nature” class=”responsive”>
As you can see above, we’ve mentioned class=”responsive”, so we first need to insert a CSS code with the class called “responsive”.
Here’s how you can do it.
Example
.responsive {
width: 100%;
height: auto;
}
The above changes help if you want the image to scale both up and down on screen size, because you’re setting the CSS width property to 100% and the height to auto.
For each and every image you upload to the WordPress media library, WordPress makes the following changes by default.
- Thumbnail: A square crop which has a size of 150px by 150px
- Medium: The longest side is 300 pixels wide or high
- Medium Large: It’s resized to 768 pixels wide
- Large: The longest side is 1024 pixels wide or high
- Full: Original image (whatever the pixels the image has, it will be shown fully without cropping anything)
Quick note: If you’re not good at coding or not tech-savvy, skip the above steps and don’t play with your HTML or CSS code on your themes because any unwanted changes can damage your whole theme and website appearance.
For non-tech-savvy people, we highly recommend using mobile-responsive themes so that any images you add to your blog posts or pages display properly on all devices, including laptops, tablets, and smartphones.
7 Common Image SEO Mistakes to Avoid
- Uploading large images can lead to slower loading times and poor rankings. Instead of uploading a 5 MB image, resize it to 1200px width and compress it to 150 KB.
- Missing Alt text, as Alt text helps Google understand the image
- Stock images everywhere, as they’re generic and don’t add any value
- Using the same image repeatedly across pages can lead to a bad user experience
- Using random file names like IMG1234.jpg instead of descriptive names
- Ignoring modern formats like WebP or AVIF
- Stuffing keywords in ALT text
FAQs
Yes, about 33% of Google search results include images. If your images aren’t optimized, you’re simply missing out on free traffic from Google Image search.
Image SEO involves optimizing your images so search engines can understand and rank them in Google Image searches.
If you want better speed with smaller image sizes, go with JPEG.
WebP offers smaller file sizes with the same (or better) quality.
Optimize your images by using descriptive file names, adding alt text to all images, compressing images before uploading, and improving page load speed so Google can easily understand and rank them.
Final Thoughts
Image optimization is not rocket science. A few simple tweaks, such as compressing images, using the WebP format, using responsive image sizes, adding proper alt text, and using the right formats, can help your visuals rank and attract free organic visitors.
To bring the best possible results with SEO, you need to do everything you can to help your website rank higher in Google search results, and image SEO is one of the best practices to increase your organic rankings.
So what are your thoughts on image optimization for SEO? Do you have any questions? Share your thoughts in the comments.


![14 Best Image Sharing Sites for 2026 [Handpicked by Expert]](https://bloggerspassion.com/wp-content/uploads/2019/12/image-sharing-sites.jpg)
Hi Anil,
Images are part of our SEO and needs to get more attention on this matter. I’m so glad you wrote this post. I usually do my own images via Canva. Its a free version but sometimes, I do pay for an image that matches up perfectly with my content.
I do find creating my own images such as pictures of the ocean, a magical sunrise and the sort gets more attention than stock images. Of course the title on the image has to team up with my content.
However, I haven’t heard of Udinra All Image Sitemap that you mention here and that looks like a perfect fit for me.
Thank you again,
-Donna
Hello sir,
I really got help from this article. I’ve learned some new things about image SEO. Thanks for sharing these helpful blogging resources. I just look your blog and found so many great articles about SEO and blogging. Thanks again.
Hi Anil Ji
You choose that subject which is most difficult part of any blogging site. Image optimization is very difficult part and this is premium service they are giving. I have face this problem also. But you have given all the technique to solve the problem . Thanks for sharing.
Hey anil sir
I am following you since long period and i am huge fan of your blogs
because you cover everything on what topic you narrate.
This post is very informative for me .
keep this good work continue.
is it necessary to keep website name in blog when we use images in our blog???? reply sir
stay safe
Thank you so much for sharing this! I have problem with big size images on website. And it can increase bounch rate..
Adding my 2 cents here
– Look out for unscaled images on your pages and scale them manually (GTMetrix gives you this info)
– Focus on overall OnPage SEO. e.g. your Heading Tag + content + LSI keywords tell Google a lot about the image that is inserted in between. Boosts both your image SEO + overall SEO.
Thoughts?
Hi Anil,
Excellent piece of information. No doubt Images plays vital role in SEO it gives the beauty of your content and user attracts more on that blogs where images utilize wisely.
However, I would also like to add that many people are using a copyrighted image without permission from the creator of the work or the copyright holder is copyright infringement. Its a mistake that most new bloggers make.
Thanks for sharing nice article.
Minakshi, yes, images are extremely important and you need to use them if you’re creating blog posts. They help you with search traffic and also add appealing look to your blog posts and pages. But most beginners don’t optimize their images for search or don’t even shrink their image sizes (which negatively impacts the page loading times), that’s why we have written this detailed guide on optimizing images for SEO. Hope it helped you.