

I have been hosting several sites on Hostinger over the past couple of years.
We are going to tell our visitors, the step-by-step guide on how you can get WordPress up and running in your Hostinger’s Account.
As you know, there are multiple hosting providers where you can set up your WordPress websites, but not all of them are good and affordable.
So, the best web host to set up your WordPress website is definitely Hostinger. It is affordable, cheap, and also the best in security and services. If you are on a tight budget, honestly speaking, you won’t get services like Hostinger anywhere else.
There are 2 ways to install WordPress on Hostinger:
- Automatically by purchasing Hostinger WordPress hosting & onboarding process (Recommended)
- By Auto Installer method (Most Popular)
In this Hostinger WordPress tutorial, you will find the practical steps for all the above methods.
Do you want to know? I advise you to go through its review if you want to know whether it is worth purchasing or not.
Method 1: Via Initial Onboarding Process
If you haven’t purchased Hostinger hosting yet, then try Hostinger WordPress Hosting. Because it would streamline WordPress setup with a one-click installer.
Out of all methods, this is the most beginner-friendly method to proceed with WordPress installation on Hostinger.
The pricing of WP hosting is the same as Shared hosting. But Hostinger WordPress hosting is more optimized for WordPress CMS and would be an excellent choice for those focusing solely on WordPress websites.
The first thing you need to get is Hostinger’s web hosting.
Once you have purchased Hostinger hosting, please ensure you have the login ID and password to log in to their HPanel.
If you haven’t purchased Hostinger, all steps are important for you. If you already have Hostinger’s web hosting, head over to the main steps.
The very first step that you have to do is open your browser and visit the Hostinger website. Please use our special link as the discount code is attached to it by default.
The next step that you have to do for installing WordPress is to select a web hosting for you. Hostinger offers different web hosting plans like Shared, Cloud, WordPress Hosting, etc.
To give you an example, we have chosen WordPress hosting, and now the next step that you have to do is to select a web hosting plan.
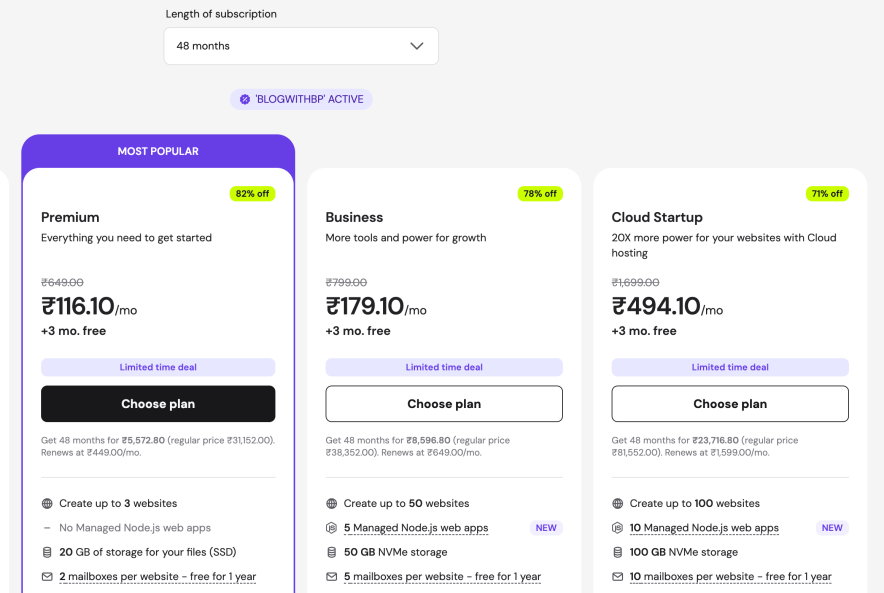
Click on the Choose Plan, and you’ll be taken to the billing page;
As you can see above, you’ll see a ₹116/mo deal. Our BLOGWITHBP discount coupon has been applied automatically.
Have a look;
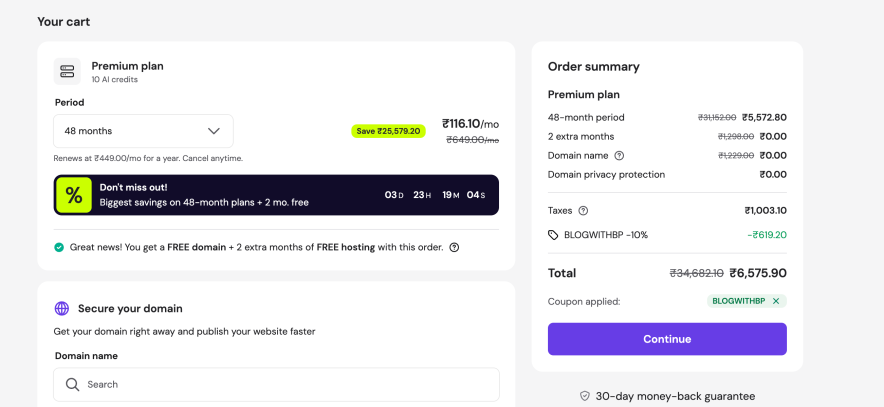
The coupon BLOGWITHBP reduced the price to just ₹116.10/mo which means, for 4 years, you’ll get it for only ₹6575!
In case you’re looking to host only 1 website, go with their cheaper plan which costs only 62 rupees per month.
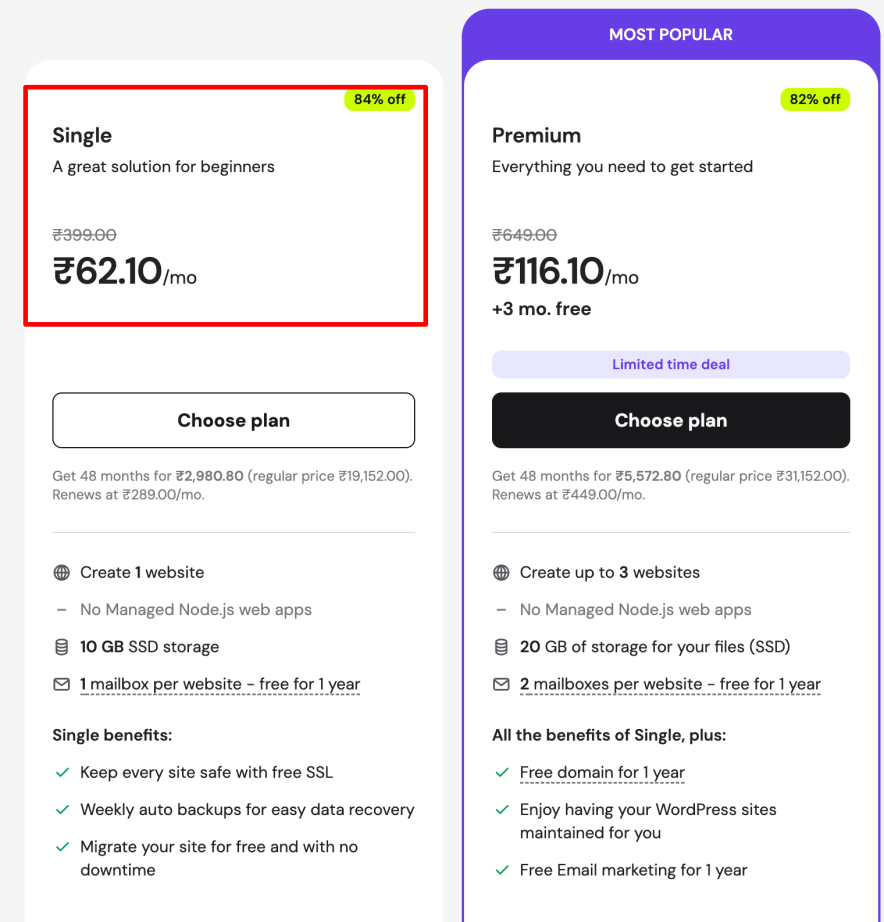
As you can see, you’ll get it for ₹62/mo. The coupon code “BLOGWITHBP” has already been applied.
Okay, after you successfully paid for your hosting, now you are just a few clicks away from installing WordPress.
So, take a deep breath and get ready to start your dream journey towards a successful WordPress blog.
The very first step you have to do is, Open Hostinger’s hPanel, where you will find the hosting account that you recently bought. [Use the username and password that you just created for yourself, also refer to the email you received after the purchase].
Here’s what it looks like;

As you can see above, you’ll get a FREE domain with the purchase of WordPress Premium plan. Click on the Claim domain to grab your free domain.
Make sure to enter your details such as name, address, email, etc to finish the domain registration process.
Have a look;

Once it’s done, Hostinger will allot you a domain for FREE.

As you can see, click on the Setup option which shows you your current hosting plan (we’re using the “WordPress Premium” plan for this tutorial).
Now the onboarding process will start, First, it will ask your website type. Make a choice and tap on the next.

Now, you have to decide whether you want to use WordPress or Hostinger AI website builder approach to create your site. Just select “WordPress” and move ahead.

Next, you have to enter your WordPress credentials. Do remember all these credentials, as it is required to log into WordPress as an admin.

In the next step, it will ask you to add plugins to your website. You can either select or skip this step.

Then, Hostinger will ask you to pick a FREE theme for your website (optional choice).

As you can see above, you can choose the layout you like or skip this step.
In the next step, it will show your domain details (if it’s registered with Hostinger, choose it, if not, you can use an existing domain).

We’ve already grabbed a FREE domain from Hostinger and selected the same.
Next, Hostinger shows you important information which looks like this;
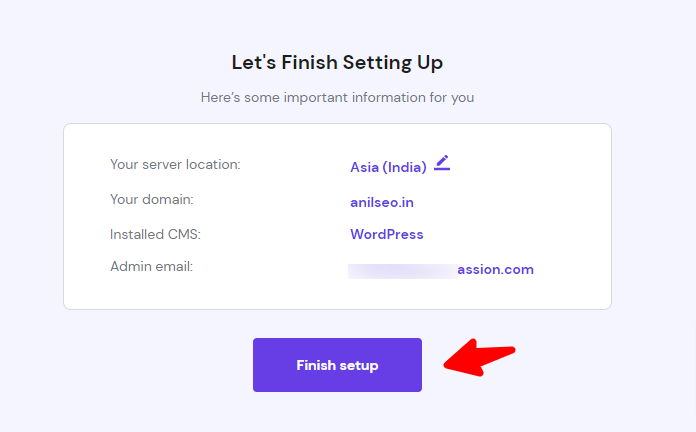
Once you click on the Finish setup button, it will automatically install WordPress on your selected domain (where it automatically installs free SSL certificate as well).
Here’s what it looks like;

Within a minute, it will finish the automatic setup and you’re done!

Now, simply open your website and start blogging.
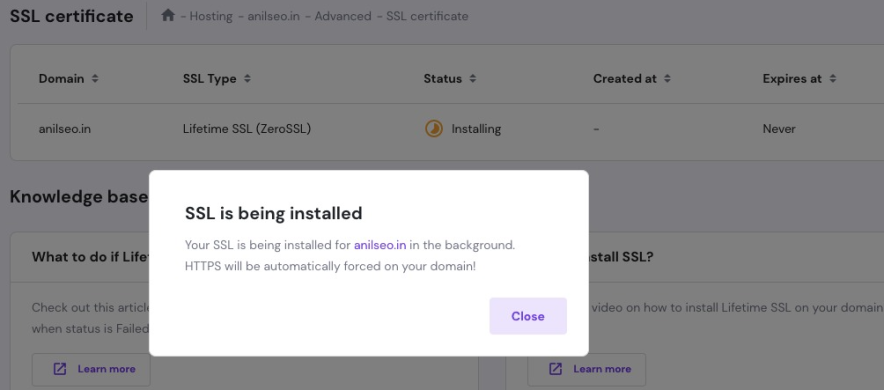
In case you don’t find SSL installed on your domain, you can visit the SSL section from Hostinger and install it by yourself. Here’s what it looks like;
Happy blogging!
This is how you can install WordPress on Hostinger, isn’t it easy and simple? Now you can start designing and creating your WordPress web website.
Method 2: Via Auto Installer
This is the most popular or general method of installing WordPress on shared hosting.
Unlike the above method where you get one-click setup benefit, this quick method is a little bit broader but the good thing is that it is 100% beginner friendly.
If you haven’t completed the Hostinger shared hosting purchasing procedure yet, first explore the shared plans, complete the payment procedure, and then log in.
Once you logged in, you will see the configured hosting and domain names details on the Hostinger dashboard. Tap on the “Dashboard” button located under the hosting section.

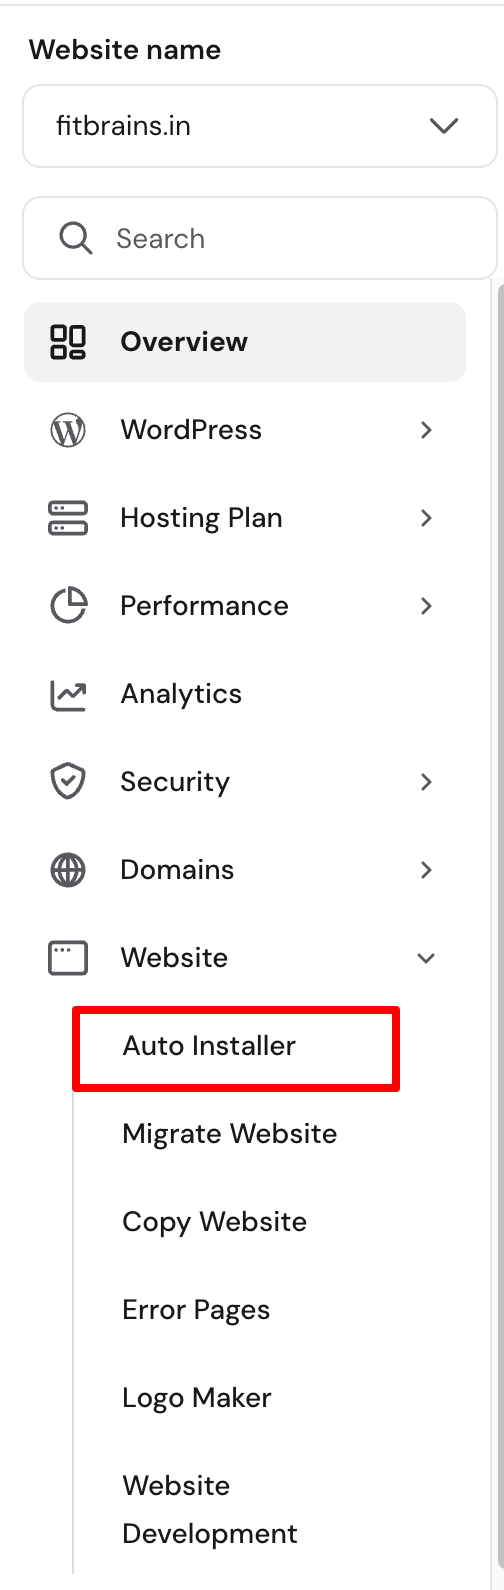
Tapping on the Manage button will navigate you inside your hosting hPanel. On the left, Under the Website tab, find “Auto Installer”.
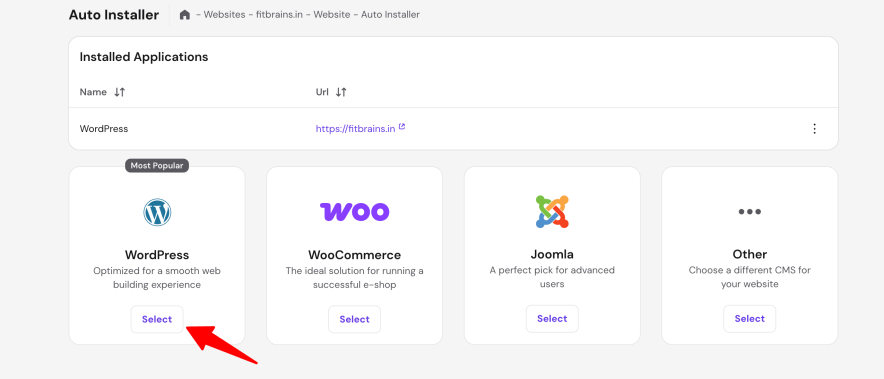
Inside Auto Installer, you will see a lot of CMS options. Make sure to tap on the select button under the WordPress CMS.
Upon selecting WordPress, all you have to input these credentials:
- Website Title
- Admin email (for login into WordPress)
- Admin user name and password
- Preferred language
- WordPress version (Please select the latest WP version)

Once you are done filling WordPress installation form, tap on the “Install button”. This is how you can install WordPress through Hostinger Auto Installer feature.
To access the WordPress dashboard after finishing the installation, all you have to do is navigate to WordPress > Overview tab from the left sidebar and tap on the “WordPress Admin” Button.
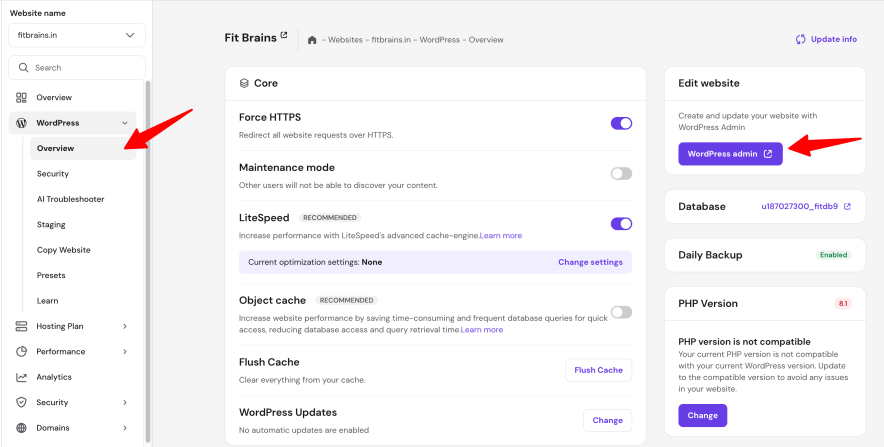
Pro tip: To access WordPress quickly, simply add wp-admin after your site URL. Example: https://yoursite.com/wp-admin/
What is WordPress?

Starting with the introduction to WordPress. So, if you are already a website user or developer, then you may know what WordPress is and why you should use it.
But for beginners, it becomes important to know that WordPress is a free and open-source CMS (Content Management System), written in PHP and paired with MySQL and MariaDB.
WordPress was initially released in 2003. It supports multiple operating systems such as Unix-like, Windows, and Linux.
Why WordPress?

Choosing the right hosting for WordPress is crucial. Discover how WordPress compares to Blogger in our comprehensive guide.
Here are the reasons to choose WordPress for your new website:
- WordPress Is Free: One of the best things about WordPress is that it is completely free. Yes, it doesn’t charge you anything to install and operate for your website.
- Say No To Code: WordPress allows you to create a website with few drag-and-drop options. It is completely free and allows users to create an attractive and professional website that even doesn’t know about HTML. You also get access to various page builders like Elementor to do your task easily.
- Time Travel: WordPress allows users to schedule the posts and pages which means you don’t have to worry about some event pages or posts. You just create the page and schedule it. WordPress will automatically make it live at the scheduled time.
- Multi-Pages Support: It allows you to distribute one lengthy page into separate different pages.
- Add Blocks: WordPress Block Editor allows you to create and design an attractive website by using predefined blocks. You just have to drag-and-drop and use the block. The best thing is that you can customize the color, size, and font of your content.
WordPress is more than enough. These were only a few of the features of WordPress. If you want to learn more about its features and services, you can read the full WordPress Features.
FAQs
Here are the steps to connect WordPress to Hostinger:
Step 1: Open Hostinger.com
Step 2: Select a web hosting and purchase a plan.
Step 3: Login to your hPanel account.
Step 4: Setup your domain, choose your hosting plan and finish the WordPress setup
Yes, you can install WordPress on your Hostinger account. All you need to do is get a Hostinger hosting and install WordPress from your Hostinger Control Panel account.
Yes, WordPress is a totally free and open-source CMS, which allows you to create and design static and dynamic websites with drag-and-drop features. A normal user who doesn’t have a knowledge of programming and coding can also create a website using WordPress. You don’t have to pay anything to install WordPress on Hostinger.
Hostinger is one of the best web hosting service providers in the world which is reliable, affordable, cost-effective for your small and large business website. The only drawback of Hostinger is that it does not provide any physical dedicated server hosting plans.
Here are a few of the best web hosting providers for WordPress:
1. Hostinger
2. Bluehost
3. WPX Hosting
4. WPEngine
5. Kinsta
Read: Hostinger Hosting Plans [Complete Breakdown – Choose Wisely]
Read: I Tried Hostinger Horizons in 2026 – My Review
Read: Best Web Hosting for Newbies in 2026
![Hostinger Coupon Codes India July 2026 [Get Up to 98% OFF Hosting & Domains]](https://bloggerspassion.com/wp-content/uploads/2024/02/hostinger-coupon-code-300x157.jpeg)

![Hostinger vs GoDaddy 2026 Comparison [Which Offers More Money Value]](https://bloggerspassion.com/wp-content/uploads/2021/11/hostinger-vs-godaddy-300x157.jpeg)


Now i am Just starting my website development work on WordPress and i am facing an issue when i am connecting it to Hostinger. after reading this i am sure now that easily i am doing this now. Thanks for explaining it in easy and simple way.