
Key Takeaways:
- Submit URLs via Google Search Console
- Add internal links from indexed pages
- Google will NOT index pages it can’t crawl or access
- Make sure your page is indexable (no noindex, blocked robots.txt)
Published a blog post, but it’s still not showing up on Google?
If you want Google to rank your pages, they must be indexed first. New websites and blog posts won’t appear in search results until Google indexes them.
Many bloggers publish content but forget to submit it for indexing. As a result, their pages never show up on Google.
This guide shows quick and effective ways to index your website and blog posts in Google.
Are you in a hurry? Check the illustration below to see how to index blog posts in Google step by step.

Note: To Index blog post in Google by using this procedure, first you need to verify your site in Google Search Console (GSC), Check out the step-by-step guide below:
How to Get Google to Index Your Blog Faster (2026 Guide)
Indexing your site on Google is completely free. You don’t need to pay anything. However, doing it correctly for the first time can be a bit tricky. Here’s a simple tutorial on how to submit your site to Google so it can start being indexed in search results.
1. Verify Your Site Ownership In Google Search Console (Required for Fast Indexing)
To get Google to index your new site, submit your URL through Google Search Console (GSC). It’s free and requires a Google account.
Step 1: Click here to visit Google Search Console. Once you click on the link, you’ll be asked to select a property type.
Here’s what it looks like;

As you can see above, you’ll find two options. One is to enter a domain name or URL prefix.
For the domain type, DNS (Domain Name Service) verification is required, whereas for the URL prefix, you can find multiple verification methods.
Step 2: We recommend using their URL prefix, as it allows you to verify your site’s ownership via multiple methods. Once you enter your site’s URL address, here’s what it shows.

As you can see above, it asks you to verify your ownership.
You can do it in multiple ways.
- By using your Google Analytics account
- Use your Google Tag Manager
- By associating a DNS record with Google
- Or by simply adding a meta tag to your site’s home page
Quick tip: If you’re using WordPress, install a plugin called RankMath SEO, as it allows you to quickly connect your website to Google Search Console so you can track how Google is indexing your website.
To verify using the Rank Math SEO plugin, you just need the HTML code from your Google Search Console which looks like this;

Copy the entire code.
Now, simply go to Rank Math plugin < General Settings < Wemaster Tools < Google Search Console
Here’s what it looks like;
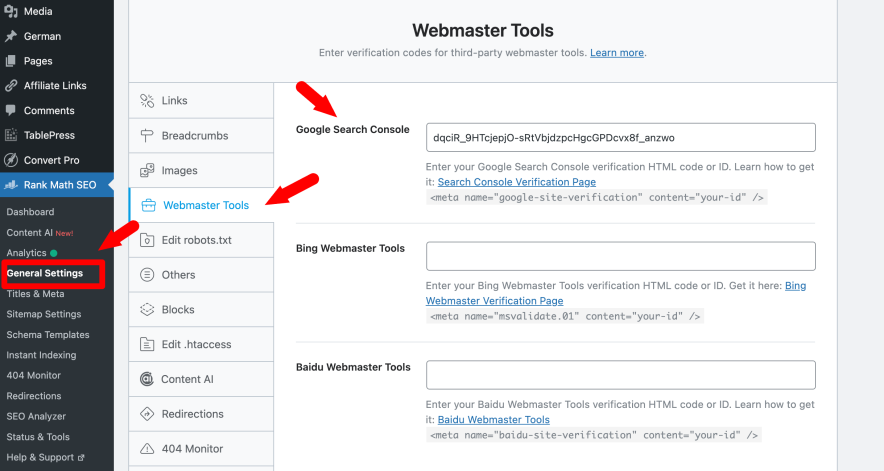
Paste the code in the Search Console field and click the “Authorize” button. That’s it, Google will verify your key and authorize your account.
Alternatively, you can also submit your site to Google using the following method.
Once you have an account with GSC, log in to it, and you’ll see a search console page where you can add a new site by clicking on “Add a property”.
Here’s what it looks like;

Click Add property from the search dropdown (you can add up to 1,000 properties in Google Search Console).
Verify domain ownership using the recommended method or any available alternate option.
Once verified, open the URL Inspection tool to submit your pages for indexing.

Enter the exact post or page URL you want to inspect.
Use the URL Inspection tool in Google Search Console to request indexing or re-fetch updated pages so Google can crawl them again.
Read: How To Quickly Speed Up a WordPress Site
2. Create an XML sitemap and submit it to Google
An XML sitemap contains a list of all the website’s URLs such as blog posts and pages. Every website should have an XML sitemap because it maps out how the website is structured and what the website includes.
Search engine crawlers can easily find your site contents if you’ve an XML sitemap because a sitemap makes it easy for the crawlers to see what’s on your website and easily index it.
Here are the 2 most important things you need to do (after creating a website or blog).
- Create an XML sitemap for your site
- Submit your site’s XML sitemap to Google
Let’s talk about each one of them so you can understand better.
Create your site’s XML sitemap
An XML sitemap helps Google find and index your pages faster.
You can create one using tools like Screaming Frog or XML Sitemap Generator. If you’re using WordPress, it’s even easier.
Install the Google XML Sitemaps plugin. It’s free, widely used, and automatically generates XML sitemaps for all your pages, posts, and custom URLs to help search engines efficiently index your site.
Here’s what it looks like;
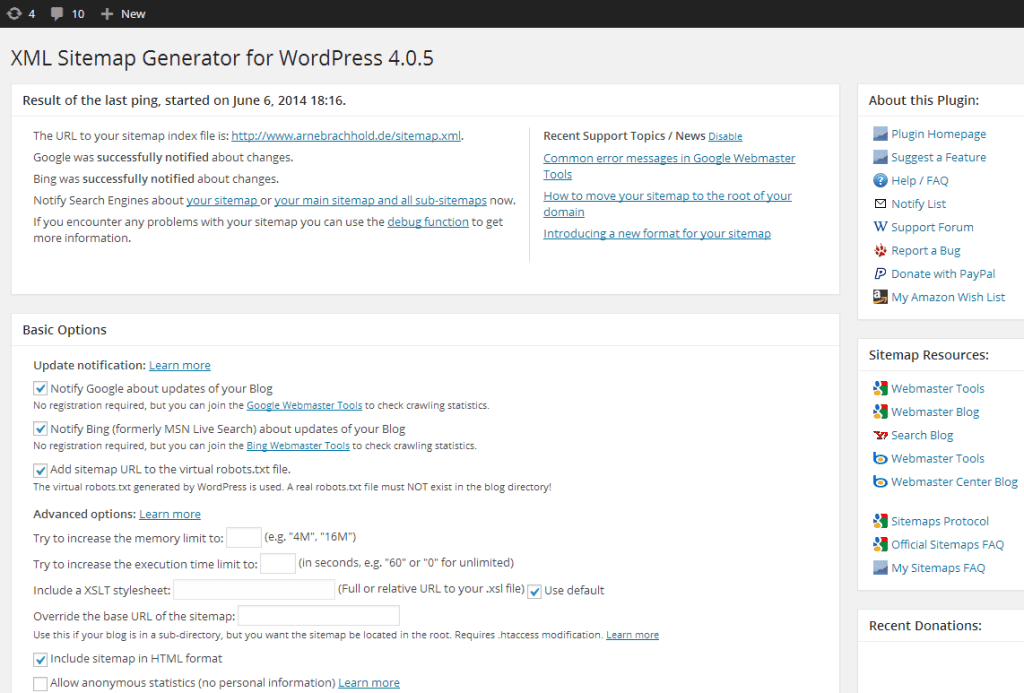
As you can see above, you don’t have to do anything extra as it works out of the box. Just install and activate the plugin.
Quick note: If you want, you can open the plugin configuration page, which is located under Settings > XML-Sitemap and customize settings like priorities. The plugin will automatically update your sitemap of you publish a post, so there is nothing more to do.
Submit your XML sitemap to Google
Once your XML sitemap is ready, submit it to Google Search Console. Go to Sitemaps, enter your sitemap URL, and click Submit. This helps Google discover and index your pages faster.

3. Fix robots.txt to Avoid Indexing Blocks
A robots.txt file tells Google which parts of your website it can crawl and index. If this file blocks important pages, Google won’t index them.
Here’s an example of robots.txt file looks like;
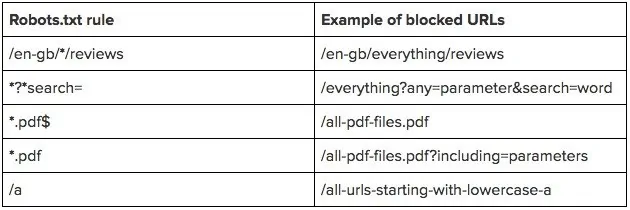
As you can see above, you can block URLs such as reviews, search elements, PDF files, etc from appearing on Google search results.
If you use WordPress, you don’t need to create it manually. SEO plugins like Rank Math let you edit robots.txt directly from the dashboard.
Here’s a quick video on using the RankMath plugin to edit your robots.txt file easily.
4. Build some quality backlinks
Backlinks are extremely important. If you want your new site to rank well or quickly get indexed by Google search crawlers, you need links.
The more high-quality and relevant links your site has, the better it is for you to get faster rankings in search results.
Here are some of the incredible ways to build links to your new site.
- Write guest posts: Publish high-quality guest posts on relevant blogs. These links help Google discover and index your site faster. Even a single high-quality backlink from an indexed site can trigger faster crawling and indexing. We’ve written a huge guide on free guest posting websites where you can find over 250 sites to submit guest posts for free.
- Do smart blogger outreach: Build relationships first. Comment on blogs, share their content, and link to them. Natural links come later and help with indexing.
- Create link-worthy content: Publish useful and in-depth content. Better content naturally attracts links, which speeds up crawling and indexing.
5. Use blog directories to submit your site
Submitting your site to blog directories helps Google discover and index it faster. Most directories are free and provide basic links and traffic.
Use high-authority blog directories to submit your site and new posts.
Also, create social media profiles for your website on platforms like Pinterest, Facebook, X (Twitter), and LinkedIn.
Share your new posts regularly. Even though these links are nofollow, their high domain authority helps Google find and index your site quickly.
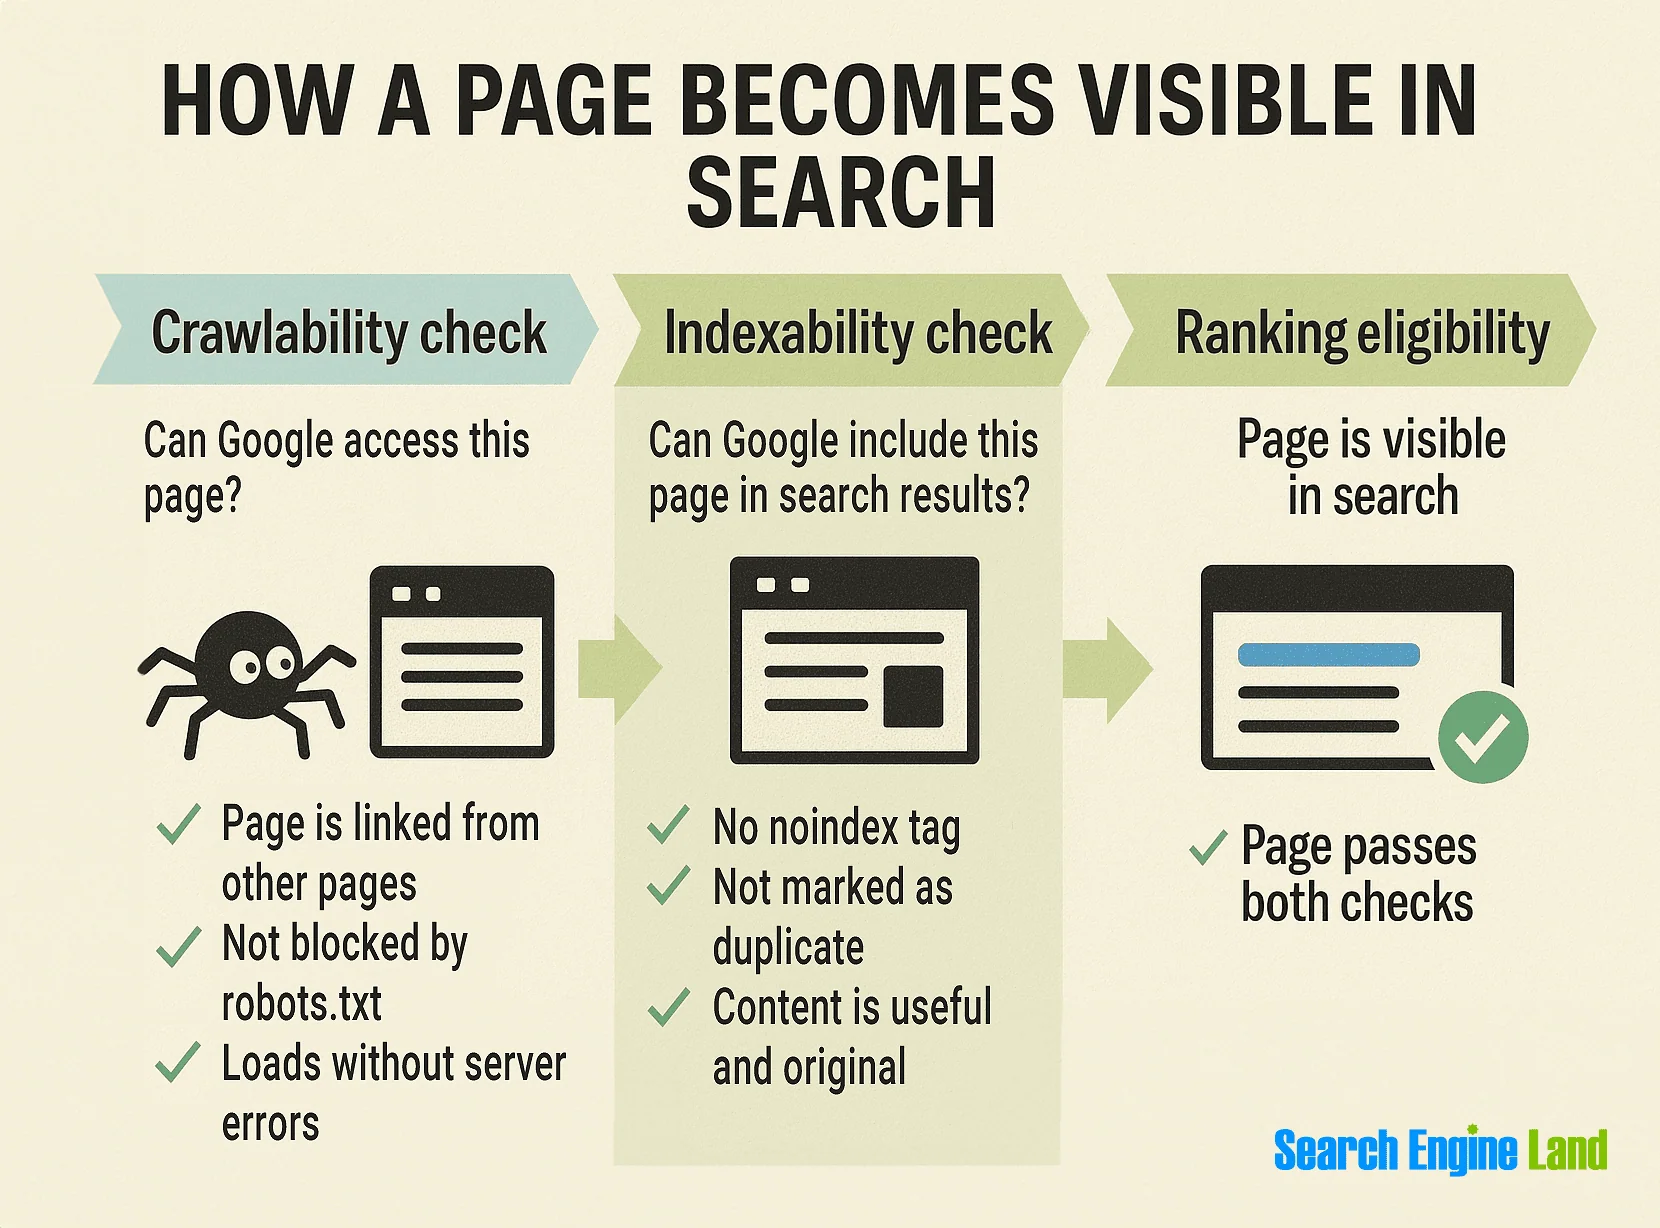
How does Google crawl and index your pages?
Have you ever wondered how often Google crawls a website?
Google constantly crawls billions of pages across the web.
- Crawling: Google bots visit your pages and fetch content like text, images, and videos.
- Indexing: Google analyzes that content and stores it in the Google Index, its main database.
If your pages are included in an XML sitemap or linked from other indexed pages, Google can discover and crawl them faster.
After indexing, Google decides when and where to rank your pages based on many signals, including content quality, relevance, links, and user signals.
When you update a page, Google may re-crawl it and update the index over time.
Here’s a simple illustration of how it works.
How to Check If Google Has Indexed Your Site?
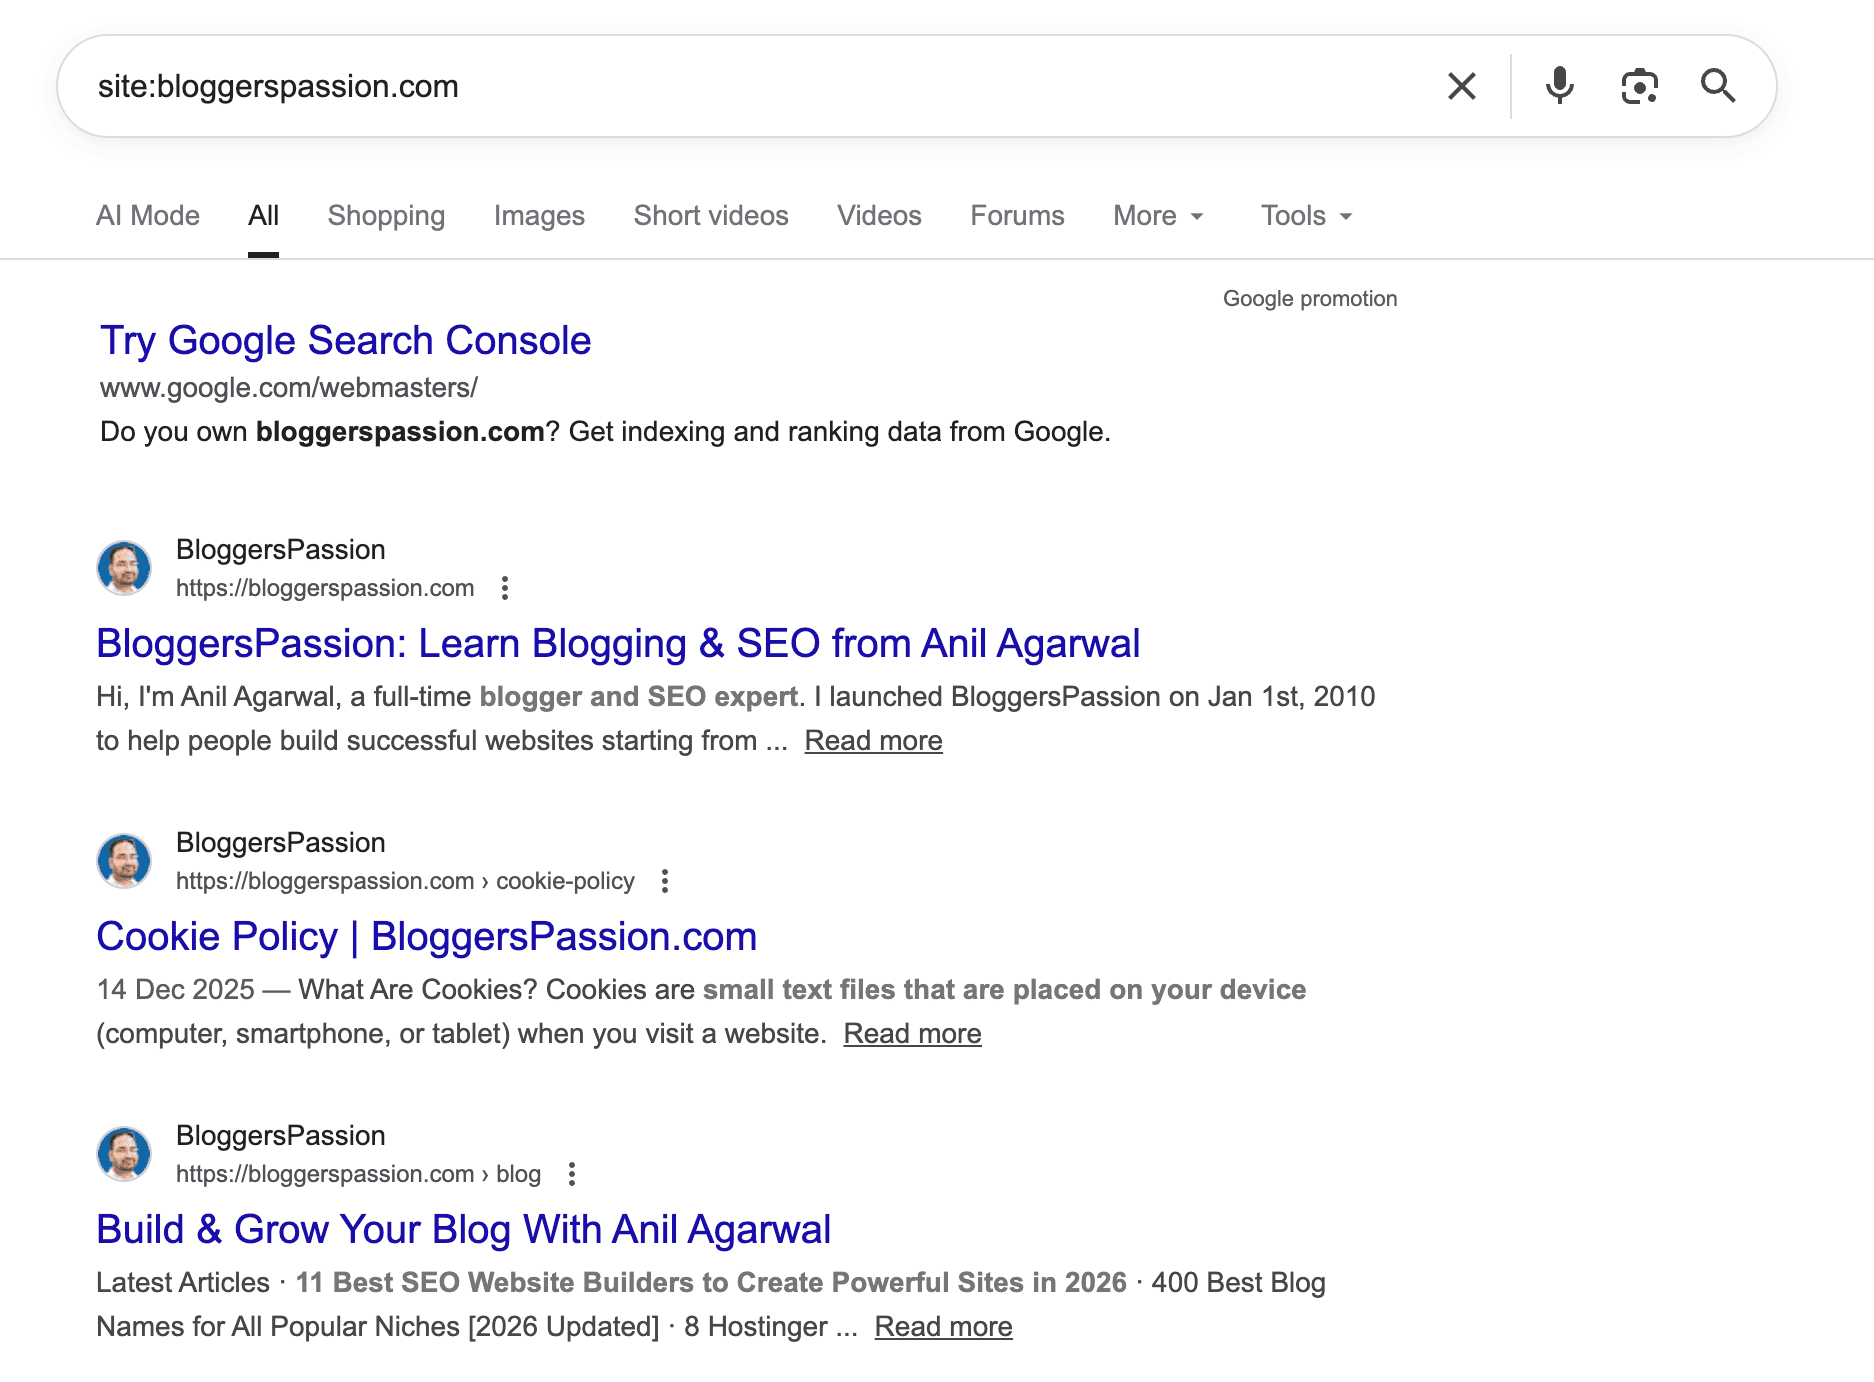
Do you want to check if a particular site is listed in Google search results?
Just type “Site:domainname.com.”
For example, here’s what is displayed in Google for our site, BloggersPassion
Final Thoughts on Indexing Your New Site on Google
Google’s crawlers are fast and efficient, but they still need clear signals.
Using Google Search Console, submitting an XML sitemap, building a few quality links, and adding internal links all help Google discover and index your site faster. Without a sitemap, Google may miss important pages.
Fast indexing is REALLY the foundation of better search rankings. If Google can’t index your pages, they can’t rank.
Found this guide helpful? Share it with others. If you have questions, drop them in the comments.
FAQs: How to Index Blog Posts in Google (Fast)
Here are some frequently asked questions around how to get Google to index your site.
Probably due to poor internal linking, low-quality or duplicate content, crawl errors, or not submitting the URL in Google Search Console.
The fastest way to index a blog post is to submit its URL through the URL Inspection tool in Google Search Console.
Indexing allows your pages to appear in Google search results, which ultimately helps you get organic traffic, visibility, leads, and sales.
Most pages get indexed within a few hours to 24 hours, but it can take longer depending on crawl access, site quality, and links.
Yes. Google Search Console is the easiest and fastest way to submit URLs, check indexing status, and fix crawl issues. It’s free.
Verify your Blogger site in Google Search Console, then use the URL Inspection tool to request indexing for the post.


Nice Article sir. URL inspection thing is new for me. After reading this post. Now i am going to add manually these pages that not showing on Google and also hide there page that not need on Google using robots.tx right ?
Thanks sir. :)