
80% of blogs fail within 18 months.
The big reason is that all Blogging Guru’s guides you to start with Step 1 and that is Pick a Niche.
But there is a Step 0…and that is very important and at this point, you are going to learn whether your blog is going to work or not.
Blogging is all about exposing your text-based content to internet users.
Who’s guiding you?
I am Anil Agarwal, the founder of BloggersPassion. I did not start yesterday. I began my blogging journey 15 years ago in 2010.
Back then, the internet was a different place. There was no ChatGPT, and ranking on Google was a lot easier.
But I stayed updated. Today, BloggersPassion generates over $15,000 every month. I have been featured in over 100 publications, including Forbes and The HubSpot.
I have seen my blog rise, struggle, and fall.
What you’ll learn:
- You’ll discover the steps to start a blog, from selecting a blog topic to making your first blog post live.
- You’ll be able to launch a blog with traffic potential, and you’ll have dozens of blog ideas to write about.
- You’ll learn about blog monetization
- You’ll learn how to avoid common blogging mistakes and build a successful blog.
Are you ready?

Starting a Blog – Steps Recap
Step 0: Topic Validation: A crucial step before beginning anything, helps you to decide if you’re going in the right direction or not.
Step 1: Topic Selection: The most crucial step in blogging is determining the niche on which you will base your blog. It includes brainstorming, exploring people’s interests, and breaking down the broader niche into a specific niche.
Step 2: Web Hosting & Domain: This step is all about giving your blog an identity. Purchasing a domain and hosting won’t require much time.
Step 3: Blogging Platform Setup: It’ll take an hour or more to complete Blog Hosting configuration, Domain Configuration, and choosing a blogging platform. The most common is WordPress.
Step 4: Complete Initial Blogging Tasks: This includes WordPress configuration, installing essential plugins, setting up basic blog pages, creating pages on social media platforms, and more.
Step 5: Blog Design: Here’s you will decide the appearance of your blog. Tasks include selecting a theme, customizing it, and more. No coding is required.
Step 6: First Blog Content: In this step, you’ll be writing a first blog that requires research, understanding the readers’ persona, and brainstorming topic ideas.
Step 7: Blog Promotion: Writing isn’t enough to bring traffic to your blog, and hence, we will look into different Blog promotion channels.
Step 8: Enable Blog Monetization: Most users start a blog to earn money. In this step, I will walk you through to blog monetization channels so that you can work on your blog money-making journey in the long run.
Is Starting a Blog in 2026 Worth it? [The Reality Check]
As of now, 7 million blog posts are published daily worldwide, and 4.08 billion people (77% of active internet users) enjoy reading blogs.
The money-making potential of blogging has surpassed $400 billion by 2026.
So yes, there is still a lot of scope in blogging both in terms of readers’ interest and earning potential.
The scope of blogging in 2026 is not over, but it has evolved significantly.
Before we begin, I want to shed some light on the current state of blogging.
- Opportunities Amid Competition: Blogging is competitive, but valuable and unique content can still drive growth.
- Evolving Formats: Traditional text blogs have expanded into vlogs, podcasts, and short-form content like Reels and Shorts. Adapting is essential along with the text format.
- Niche Focus Matters: Standing out requires targeting specific niches instead of broad, saturated topics.
- Monetization Opportunities Are Still Strong: Yes, these all-time methods are still working: affiliate marketing, ads, sponsorships, and digital products.
- SEO Has Become Smarter: Now, user-value-driven content prevails over content that is overly optimized for SEO.
- Impact of AI: Yes, AI tools like ChatGPT have influenced blogging, but human creativity and personal insights remain invaluable.
I guess you now understand the scope of blogging and its current situation.
Now let’s jump to the blogging steps.
Step 0: The Smart Start – Validating Your Blog Idea using AI

In 2010, I had to spend weeks manually checking keyword volumes and reading hundreds of forum posts to see if a niche was worth my time.
In 2026, you can do this in under 10 minutes.
Most beginners fail because they start at Step 1: “Pick a Niche.”
You need to start at Step 0.
This is where you use AI to find “Information Gaps” (The specific things your competitors are failing to tell their readers).
Why is “Step 1” Too Late?
According to a 2026 HubSpot State of Marketing report, 86.4% of marketers now use AI tools for strategy and content ideation.
If you aren’t using AI to validate your ideas before you buy a domain, you are already behind the curve.
Traditional niche research is slow and often based on “gut feelings.”
The AI-augmented workflow uses large language models to analyze thousands of data points instantly.
Validating Your Niche in 5 Minutes with AI
I use this exact method to see if a blog idea has the potential to actually make money.
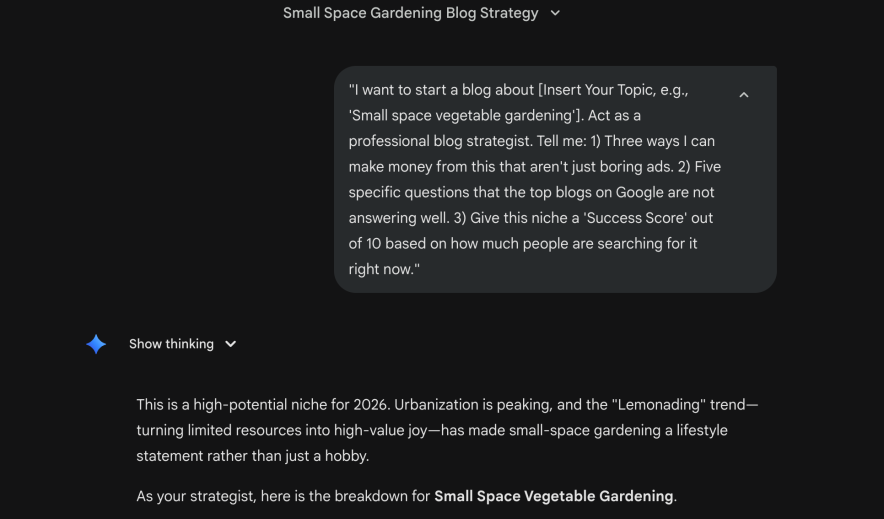
Copy and paste this prompt into Gemini or ChatGPT to see if your blog idea has a gap you can fill:
“I want to start a blog about [Insert Your Topic, e.g., ‘Small space vegetable gardening’]. Act as a professional blog strategist. Tell me: 1) Three ways I can make money from this that aren’t just boring ads. 2) Five specific questions that the top blogs on Google are not answering well. 3) Give this niche a ‘Success Score’ out of 10 based on how much people are searching for it right now.”
Once you put this prompt in action, you will get a success score like I got for the Small space vegetable gardening blog idea.
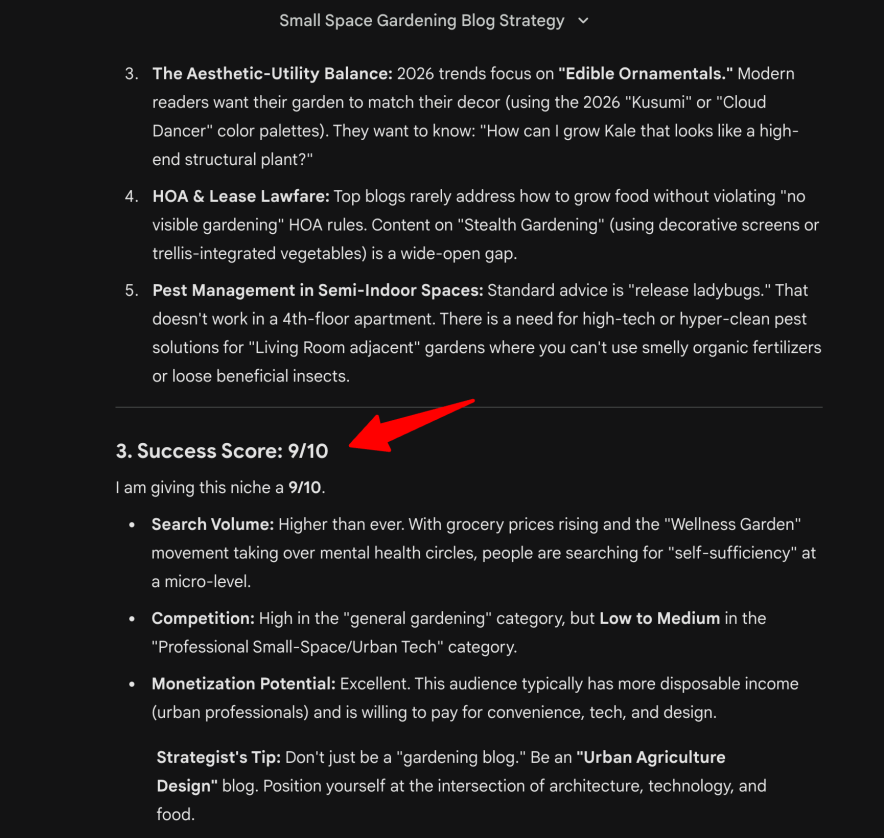
The AI model lets me know that my blog idea has a content gap in the internet. It also suggests to me the strategy that I use to monetize the blog in various ways.
P.S Use Gemini, it’s slow thinking feature to analyze the prompt in a much deeper way than ChatGPT.
So now you’re getting me that validating a blog idea is really crucial in the starting.
But why are we using AI for that purpose?
Well, obviously, you are a beginner, and guessing work should be avoided.
A study from Content Marketing Institute (2026) found that blogs using AI to find these “gaps” see 38% faster growth than those that don’t.
AI is smarter. Why don’t we start utilizing it?
Step 1. Begin with Blog Topic Selection
90% of bloggers make mistakes at this step.
So, how can you make the right choice when it comes to selecting a blog topic?
1. Choose a “Future-Proof” Niche:
Well, If money making is your goal then you can’t choose a blog niche you love.
You have to choose an idea that humans are willing to pay for. And obviously, AI cannot easily replace them.
To help you decide, I have mapped out several popular niches where the money making potential is huge.
| Topic Category | How Easy is it to Write? | How Much Can You Make? | Why it Works in 2026 |
|---|---|---|---|
| Simple AI Tools | Easy | Very High | People want to save time using new tech. |
| Health & Living Long | Hard (Needs Proof) | High | Everyone wants to feel younger and healthier. |
| Personal Finance | Medium | High | People always need help saving and investing. |
| Eco-Friendly Living | Medium | Medium | Sustainable products are a growing market. |
| Remote Work / Travel | Easy | Medium | The “Digital Nomad” life is still booming. |
| Pet Health & Care | Easy | Medium | People spend billions on their “fur babies.” |
| Home Office Setup | Easy | Medium | High demand for ergonomic and cool gear. |
| Mental Wellness | Hard (Needs Heart) | Medium | High search for stress and anxiety relief. |
I don’t pick them randomly. These are based on our team’s research from various credible sources, including PrometAI, and Statista.
2. Try Brainstorming Your Passion and Interests:
Back in 2010, I learned a lot about topics like blogging and SEO, and these topics were my passion.
Basically, I could talk about them for hours and write dozens of pieces of content, which is why I chose this idea.
I guess if I had chosen a fitness or health topic, I would have failed because those topics don’t excite me. They bore me.
So, the first step is to think about ideas that truly excite you, things you can talk about and write about consistently.
You don’t need to be an expert in the topic, but you should have at least some knowledge to create original content instead of completely relying on competitors.
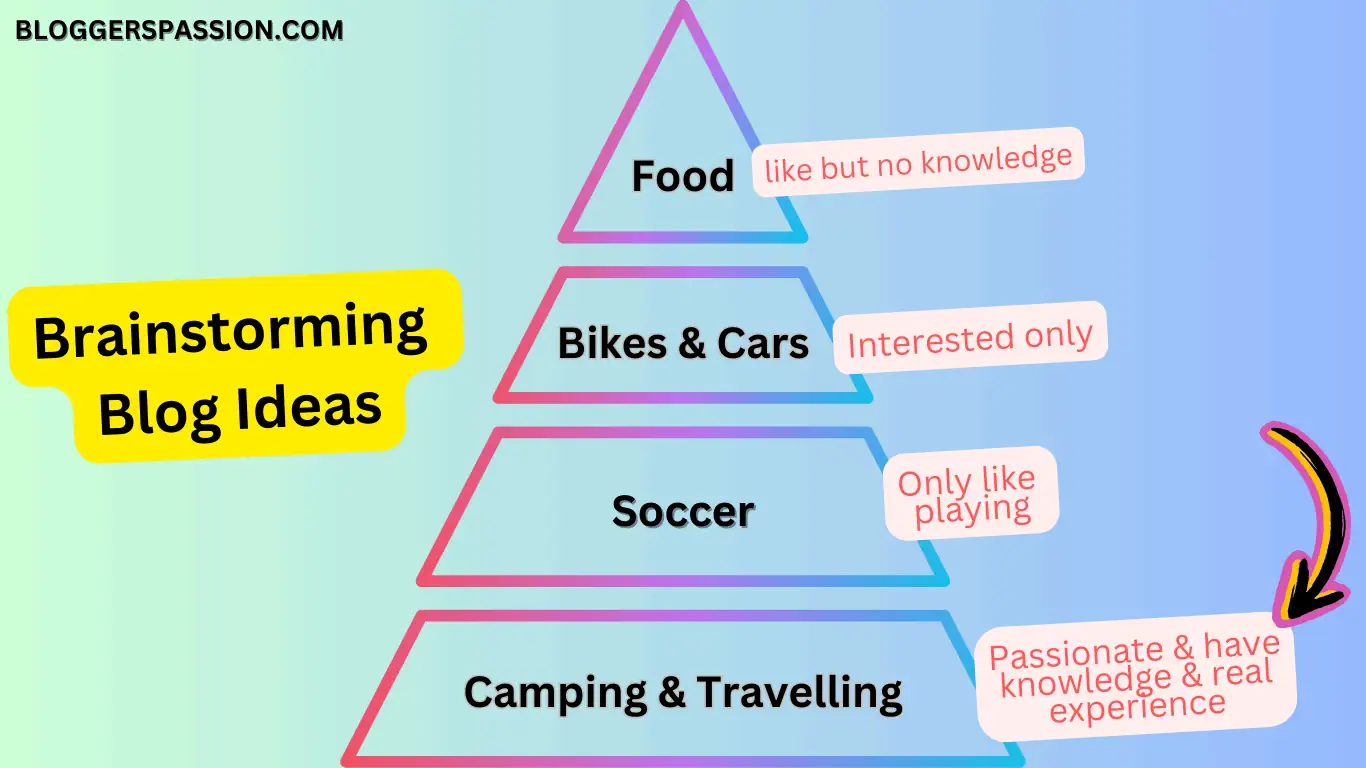
For example, let’s say you’re passionate about camping. You have real experience with camping gear, the best locations, and survival skills, and you want to share your experiences with others through your blog.
Hence, you decide to start your blog with the topic “camping.”
What next?
3. Verify the Readers Demand:
Imagine if the blog idea you’re passionate about doesn’t have any demand? Then creating a blog on it would be a waste of effort. Isn’t it?
So, before proceeding with your blog idea, you need to cross-check whether readers are searching for topics and questions related to your blog idea on search engines at a broad level.
To do this, first, think of some subcategories related to your broad blog idea that your potential readers might be searching for.
For example, if your blog idea is “Camping,” its subcategories could include camping gear, family camping, camping spots, or kids camping.
Enter each subcategory related to your blog idea one by one, and don’t forget to check reader availability location-wise as well.
In the Google Trends results, analyze the data for the past year. Make sure the average interest for your blog idea in any month hasn’t dropped below 20-30.

If the trend graph consistently stays at 30 or below, it indicates low demand for your blog idea.
In this case, you might face challenges in coming up with future content ideas and gaining traffic.
However, if the Google Trends graph shows a higher flow, congratulations! It means your blog idea has demand, and people are actively searching for topics related to it on Google.
Wait!!! Your blog idea is not finalized yet!
What Next?
4. Breakdown the broader blog idea into a specific niche:
If you choose a broader idea (for example Fitness, Camping, Health, Entertainment, etc are broader categories) your blog will be smashed by the enormous competition and all efforts will be wasted.
So what’s the solution?
Well, you have to narrow it down to a specific niche to stand out.
For example, we have a blog called HostingMonks.com where we only cover topic ideas related to web hosting and not with blogging & SEO.
Similarly, Don’t choose “food”, focus on something like “Vegan recipes”.
Don’t choose “camping”, focus on something specific like “kids camping”, or “solo camping for beginners” or “camping for beginners on a budget”.
You can target 1-2 sub-specific niches in your blog. This will help you establish your brand in a few sub-niches and allow you to target a specific audience effectively.
Getting my point?
If the interest remains above 30 throughout the year, you can finalize those specific niches and include them in your blog idea.


5. Pick Something You Can Monetize
9 out of 10 new blogs started to aim to earn money, if this is the case with you please pay attention.
If everything goes smoothly at this point, you must have a couple of specific ideas for your new blog.
Now to finally proceed with the blog ideas, the last thing is to check the available monetization options.
I still remember my very first blog experience. What happened was that I created a blog on “how-to tutorials,” published around 15-20 pieces of content, and later realized I couldn’t monetize it at all. All my hard work went to waste.
The two most popular monetization methods in blogging are affiliate marketing and ads.
While ads can be enabled on almost any blog, affiliate marketing requires a bit more planning.
To make affiliate marketing work, it’s essential to check at the beginning whether products related to your blog idea are available for promotion or not.
In other words, you need to ensure that affiliate programs are available for your potential products in the market.
I have explained the monetization aspect of blogging in the last make money blogging step.
Step 2: Select a Unique Domain Name & Blogging Platform
Part 1: Choose a Domain Name:
A domain name is your blog address in the internet world. For example: mine is https://bloggerspassion.com/
Picking a memorable blog name is always hard.
- Memorable: Easy to remember and spell.
- Relevant: Reflects your blog topic or niche.
- Simple: Avoid using hyphens, numbers, or long phrases.
I usually follow these above 3 rules whenever I need to finalize a domain name for my new blogs.
If you have already guessed some amazing names, then awesome.
Otherwise, take AI help. Let’s try Gemini.
As soon as I entered a short description about my blog idea, it presented me with a couple of domain name ideas.
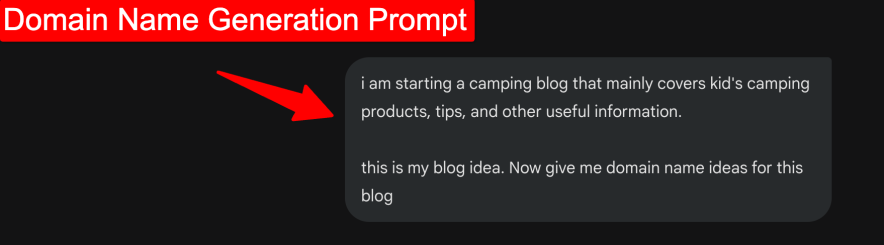
As I mentioned earlier, I finalized the blog idea “Kid Camping,” and this tool suggested some great domain names for it. These names are memorable, niche-relevant, and simple:
- campwithkids.org
- campingwithkids.net
- kidfriendlycamping.com
Before finalizing a domain name, you should also pay attention to the TLD (Top-Level Domain).
For example, .COM is a global TLD that’s ideal for blogs aiming to target a worldwide audience. However, there are plenty of other TLDs available for different purposes, such as .in, .net, .org, .AI, and more.
So, take a moment to finalize a domain name and TLD that aligns with the purpose of your blog.
Part 2: Choose a Blog Hosting Platform:
You have two choices: Either choose a web hosting to get your blog online or simply write your blog on third party platforms as a hobby for free.
| Platform | Best For… | Monthly Cost | Pros | Cons |
|---|---|---|---|---|
| Hosting Service | Business & Full-Time Income | $3 – $10 | You own everything; best for SEO. | Small learning curve. |
| Substack | Writers & Newsletter fans | Free | Instant audience; very easy. | They take 10% of your earnings. |
| Wix / Squarespace | Visual-first beginners | $16 – $25 | Drag-and-drop; looks beautiful. | Expensive; harder to customize. |
| Medium | Hobbyists | Free | No setup required. | You don’t own the audience. |
Which one is for you?
- Do you want a simple place to write your thoughts for free? Choose Medium.
- Do you want to build a paid newsletter? Choose Substack.
- Do you want a professional blog that makes passive income? Choose a hosting service.
Are you getting me?
A hosting service lets your blog visible to the internet or simply to search engines like Google. They give you a server where your website files would be stored.
You cannot proceed by skipping this crucial step in a blogging journey.
There are hundreds of Web hosting companies out there.
I used to recommend Bluehost but I was receiving plenty of complaints about their support from my readers.
Now this is your new blog, opt-ing for a high end performance expensive server is useless as the traffic is almost zero.
So for the beginning stage you can seek a web host which gives you enough resources, reliable performance, etc in budget.
I recommend “Hostinger” money value web hosting plans to the new bloggers. My readers gave good ratings about their support, and performance.
With Hostinger $1.99/month (₹116) plan you get:
- 3 Year of hosting server
- Free domain for a year (saves you $15-$20)
- 100 GB Storage
- AI Website Builder & More
Browse through Hostinger’s hosting plans, where our exclusive 90% off coupon code (BLOGWITHBP) is already applied.
Once you’ve selected the plan, head to the checkout page and complete your purchase to set up hosting for your new blog.
What Next? It’s time to set up a domain and hosting. Don’t worry, it won’t be technical.
Step 3: Configure Your Blog Hosting, Domain & Blogging Platform
Now the first thing you have to do is to login to the hosting panel. It will look like this:

The main objective of this step is to connect your web hosting with your domain name.
Additionally, we’ll show you how to install the blogging platform (CMS) “WordPress” on your hosting.
There are several blogging platforms available, including WordPress and Blogger. However, choosing WordPress is the best option because it allows you to do endless things on your blog using plugin functionality.
Plus, WordPress is completely free of cost.
Once your blogging platform is set up, you’ll be able to customize your blog’s design and publish content without any coding requirements.
Part 1: Claim and Register Your Free Domain Name for the Blog
Log in to your Hostinger account and click on “Claim a Domain.”
From there, enter your name, address, personal details, and the domain name you finalized earlier.
That’s it! Your domain name will be registered for one year, completely free of charge.
Part 2: Select WordPress as Your CMS (Blogging Platform)
Once you claim the domain, it’s time to set up hosting and install WordPress.
Tap on the “setup” button shown on your purchased hosting plan.


Next, you’ll need to set up your WordPress credentials.

Next, you’ll be prompted to choose plugins and themes. Please skip these two steps.
Next, you have to choose a domain name you have just registered in the previous part.

Next, tap on the finish button to install a WordPress blogging platform on your blog.

Don’t freak out guys!!!
If you face any problem with WordPress setup, please check this detailed guide of WordPress installation on a hosting platform.
Or contact me directly.
Part 3: Accessing Your Blog Dashboard
After installing WordPress, access your admin dashboard by visiting: https://yournewtblog.com/wp-admin/

If you’re new to WordPress, don’t worry! It’s an incredibly beginner-friendly blogging platform.
Explore this beginner friendly WordPress dashboard guide to get a feel how this non coding platform works.
Step 4: Get Done With Basic Blogging Tasks
Before we head to the blog content part I would like you to finish these one time WordPress related tasks.
1. Configure Basic WordPress Settings:
- Go to Settings → General in WordPress and update:
- Site Title: Your blog name.
- Tagline: A short description of your blog.
- Set your Time Zone and preferred Permalinks structure (under Settings → Permalinks).
✅ Recommended Permalink Structure: “Post Name” (e.g., yourblog.com/sample-post/).
- Set Permalinks: Go to Settings > Permalinks and choose “Post Name” for clean URLs.
- Add Site Info: Under Settings > General, add your site title, tagline, and ensure HTTPS is enabled.
- Adjust Reading Settings: Uncheck “Discourage search engines from indexing this site” in Settings > Reading.
- Optimize Media Settings: Configure image sizes under Settings > Media to prevent large uploads.
- Ensure Site Visibility: Confirm search engines can crawl your site in Settings > Reading.
2. Install Essential Plugins
Do you know the main reason why WordPress is the best blogging platform? Well, it’s because of its plugins.
Think of plugins as add-ons that enhance the functionality of WordPress.
For instance, if you want to set up a sitemap for your blog, typically, you’d need to manually create a sitemap.xml file and upload it to your website’s files.
But tasks like these, which involve coding, are best suited for developers.
For beginner bloggers like you, WordPress simplifies everything by offering plugins for even the smallest tasks.
Navigate WordPress Dashboard > Plugins > Add New

Here, you’ll find thousands of free plugins designed for various tasks.
Let me share a few plugins you should consider installing on your blog. These are the ones I’ve personally used on my BloggersPassion blog for years.
I understand it might feel a bit strange to install unfamiliar plugins, but trust me, these plugins will prove invaluable for your blog’s future growth.
- SEO Plugin: It helps you perform on-page SEO tasks and optimize your content for search engines. Example: Rank Math.
- Security Plugin: Protects your site from hackers. Example: Wordfence Security.
- Caching Plugin: Speeds up your site. Example: WP Rocket Review
- Spam Protection: Keeps your comments section clean. Example: Akismet Anti-Spam.
- Contact Form: Help in setting up a contact form on your blog. Example: Contact form by WPForms
- Store Plugin: Help in setting up an eCommerce store without any coding. Example: WooCommerce
- Ad Inserter: Install only when you are planning to monetize your site with Google AdSense. Example: Ad-Inserter by Igor.
- Affiliate Marketing: Helps you manage affiliate links easily. Only install if you are looking to set up affiliate marketing based blogs. Example: Easy Affiliate Links
- Image Optimization Plugin: Ensure fast delivery of images to the readers. Example: ShortPixel Image Optimizer.
- TOC Plugin: Helps you enable table of content in your blog content. Example: TOC Plus
3. Create Essential Pages:
These are the one time effort contents, Start with these must-have pages for your blog:
- Home Page: A welcoming page for your visitors.
- About Page: Introduce yourself and explain what your blog is about. (See Mine)
- Contact Page: Add a contact form so readers can reach out. Plugin: Use WPForms.
- Privacy Policy and Disclaimer: These are important for legal compliance.
Remember, you have to add them in the WordPress dashboard > Pages > Add New
4. Submit Your Site to Google Analytics & Google Search Console (Optional)
This step is only for those serious bloggers who are looking to track website traffic coming to their website.
I pointed my blog to these free tools already.
Google Analytics is a free tool that allows you to track your site’s traffic behavior, top pages, audience demographics & more.
Similarly, Google Search Console is used to track traffic coming from the Google search engine. You can manage your site, the sitelinks that you want to appear, disavow bad backlinks etc. You can submit your sitemap to Google here. Click here to learn more.
Yes, the process is a bit technical and there are dozens of ways to point a blog to these tools.
I suggest searching how to add Google Analytics / Google Search Console to a WordPress blog on YouTube, you’ll definitely get a simple video guide.
5. Create Official Pages On Social Media Platforms:
This is essential for creating your brand presence and will also give your domain some trust signals.
For now, create accounts on Instagram, Facebook, and Pinterest, as you might consider creating content on these platforms in the future.
Step 5: Time For Blog Design
Don’t worry, you don’t have to hire a web designer and spend bucks for the sake of blog design.
At the beginning, what is enough?
You just need a simple theme that can change the complete look and feel of your blog in a single click.
I used to experiment a lot with my blog design and theme, but finally settled on simplicity.
See, this is what my blog design looks like:


Whenever my readers ask me to suggest a theme or design idea I tell them to follow these rules:
Your blog’s theme and design should look clean, be user-friendly, and feel engaging without overwhelming the user.
Part 1: Installing a Simple & Elegant Blog Theme:
There are plenty of themes out there but the fastest theme WordPress platform supports is GeneratePress & Astra.
I am using the GeneratePress premium version on my site but the free version is more than enough at the beginning stage of the blog.


What I like about both themes is that they offer ready-made templates for business, eCommerce, and blog-based websites, which can be applied to your site with just one click.

Astra’s website theme templates stand out as they are richer and more versatile, covering a wide range of popular niches like food blogging, travel blogging, tech blogs, parenting blogs, pet blogs, crypto blogs, and more.

Setting up a theme on WordPress is simple. Just go to your WordPress dashboard, then head to Appearance > Themes > Add New Theme.

Part 2: Customize Your Blog Theme for a Unique Look:
Once the theme is installed, you can customize various design elements like the logo, header, navigation menu, and more with ease.
Navigate to Appearance > Customize.
The new world of design possibilities will open for you.
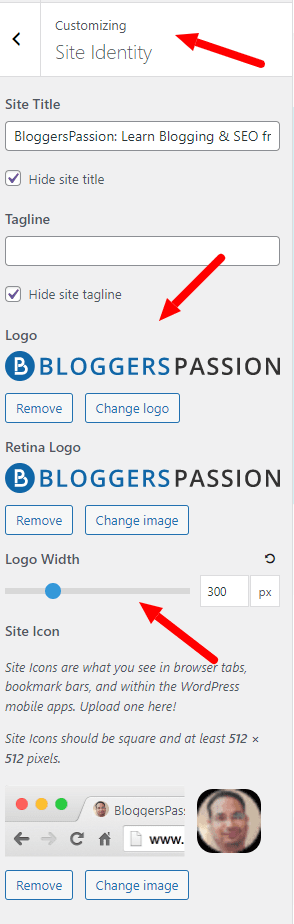
No matter which theme you choose, you’ll come across similar design customization options:
- Logo and Site Identity:
- Upload your logo.
- Add a favicon (site icon).
- Use free tools like Canva to design them.
- Colors and Typography:
- Pick a color scheme that complements your blog topic (e.g., calming blues or energetic yellows).
- Use Google Fonts for professional typography.
- Header and Menu:
- Keep your menu simple (Home, About, Blog, Contact).
- Use a sticky header if available.
- Homepage Layout:
- Set your homepage to display either your latest posts or a static welcome page.
- Footer Widgets:
- Add a brief bio, recent posts, or social media links in the footer.
I understand that tweaking design options for the first time can feel strange and confusing, but you’ll get the hang of it quickly.
Most of the time, you only need to make minor adjustments since the template you choose automatically adapts your blog in the best possible way.
It’s essential to customize key elements like the Header, Homepage, and Main Content Area.
Most blogs follow a common layout structure, but it’s a good idea to make some adjustments to help your blog stand out.
Suggested Layout Example:
- Header: Logo + Simple Menu (Home, About, Blog, Contact).
- Homepage Banner: A clean banner with a short tagline or call-to-action.
- Main Content Area: Display your latest blog posts in a grid or list format.
- Sidebar (Optional): Add a search bar, categories, and recent posts.
- Footer: Include a bio, social media icons, and a subscription form.
If you have a specific blog design in mind for inspiration, you can use that as a reference to make your blog uniquely yours.
Step 6: Plan a Roadmap to Your First Blog Content
Everything we’ve done so far has been to prepare your blog for publishing content, right?
So, please pay close attention here.
I’m not sure what your blog is about or the type of content you plan to create, but I’m going to share a content roadmap that I personally follow on my blog.
This strategy will always work for you, helping you publish content on your blog based on a real proven approach. I promise you’ll never run out of topic ideas.
Are you ready?
Part 1: Study Your Readers:
I guess before jumping into writing, you should first understand who your readers are, their problems, and their goals.
- Ask yourself these questions:
- Who are my readers? (mine is beginner bloggers)
- What are their goals? (my readers want to learn blogging basics & start earning)
- What problems are they facing? (struggle with consistency, content creation, etc)
- What kind of content would they find valuable?
If you create a reader persona beforehand, it will be much easier for you to connect with them through your content.
On a new blog, there are no readers yet, so how will you know about them?
Well, to learn more about your readers, you can use Reddit. People discuss all kinds of topics there and share advice on related problems. By reading 10-15 threads, you’ll start to get a better understanding of your readers.
Or just take the help of AI.
- Action: Copy the URL of a relevant Reddit thread or a competitor’s comment section.
- Prompt: “Analyze these 3 Reddit threads. Identify the ‘Anxiety Triggers’ (fears) and ‘Aha Moments’ (desires) for a parent buying their first kids’ camping tent. Create a ‘Buyer Persona’ named ‘Outdoorsy Olivia’ based on these insights.”
Part 2: Figure Out the Ideal Content Types:
Every niche is unique, and the same type of content doesn’t work everywhere. For instance, in our blogging niche, readers mostly look for coupons, so we focus on creating that type of content. But this might not work for you.
So, the ultimate question is: How do you figure out what type of content your readers want?
You can identify the kind of content your niche audience prefers through simple competitive analysis.
The common content types are:
- How-to Guides: Step-by-step solutions to problems.
- Lists: (e.g., “10 Best Blogging Tips”).
- Reviews: (e.g., product or service reviews).
- Case Studies: Real-life examples.
- Tutorials: Practical, actionable advice.
- Personal Stories: Relatable content that builds trust.
- Pillar Posts: Resourceful guides on one topic. Here’s how to create it.
We usually rely on the Semrush SEO tool (it offers a 14-day free trial) for competitive analysis. It lets us identify our competitors’ most popular blog posts with just one click.

You can still do this manually without any tool.
- Visit your competitors’ blogs.
- Look for the section or category featuring their most popular content.
- Analyze posts with the highest number of user comments.
More comments mean higher engagement.
By following this process, you’ll get a clear idea of which content types work best in your niche, allowing you to focus on similar topics for your blog.
Any doubts?
Part 3: Brainstorming Blog Topics (Keywords):
Now you know what type of blog posts you need to create.
But the question is, what topics will you create content on?
Trust me this is a common point where both writers and bloggers are stuck and go blank.
I’m sure you finalized your blog idea in the first step.
Now, your next task is to find topics that your readers are actually searching for.
Using the Google Auto Suggest method, you can easily discover topic ideas based on the most trending searches by your target audience.
Choose 2-3 main categories related to your blog idea, such as “Kids Camping” or “Camping Stove”
Go to Google and use a question modifier like “How.” Then type “Kids Camping” with an asterisk (*) in between. Google will suggest commonly searched questions related to your topic.

Use different modifiers such as “What,” “Why,” or “Best” to discover even more queries. Repeat this for other categories, and you’ll quickly generate a list of content ideas for your blog.
If you don’t like this approach you can always try seo tools to discover potential keywords.
We have been using the Semrush Keyword research tool for like 8 years to find topic ideas. Semrush is an essential blogging tool that helps you in every aspect of your blogging journey. You can extract a lot of keywords (content ideas) for your blog using this tool during the 14-day trial period.

Semrush not only provides you with topic ideas (keywords) but also gives exact data on how many times users search for those potential keywords on Google.
This kind of information is incredibly valuable.
✅ Tip: Focus on topics that solve specific problems or answer common questions.
At the beginning of my blogging journey, I made the mistake of writing content on topics I found interesting or thought readers might be interested in.
But now, I never work on any content without proper keyword research, and this ensures a steady flow of visitors to my blog.
Part 4: Create a Content Calendar:
The content calendar is just a template that helps you stay consistent and organized.
My blog currently features over 500 posts, and we still rely on a classic approach “Google Sheets” to manage our schedule for creating new content and updating old posts.
The topic ideas you gathered in the previous step can easily be organized and tracked in your content calendar sheet.
The main columns you can add to your content calendar google sheet are:
- Content Title
- Category/Niche
- Target Keyword
- Content Type
- Publication Platform (Blog, Instagram, etc)
- Author/Owner
- Status (Draft, In-Progress, Published)
- Deadline
- Publish Date
- Content Goals (Increase traffic, Boost engagement, Drive conversions, etc)
- Word Count/Length
- Content URL
- Notes/Comments
Part 5: Start Writing First Blog:
WordPress dashboard > Posts > Add New

This is where you have to write down your content and publish it.
But wait there is a homework
When I wrote my first blog post, it was terrible because I had no idea how to research, format, or structure it properly.
But now, I follow a step-by-step process to ensure my blog posts are both reader-friendly and SEO-friendly:
1.) Finding keywords:
Once you’ve finalized your topic, you need to find relevant keywords.
This process can be done easily using the Semrush keyword research tool. Simply use their Keyword Magic Tool to identify high-potential keywords.

2.) Prepare outline:
Next, create an outline for your content. You can take inspiration from your competitors’ content, but remember—this is just for reference.
Avoid copying their content. Your goal is to create something better and more valuable.
To make your content stand out, focus on original research. You can achieve this by incorporating unique facts, infographics, case studies, and experiments into your content.
3.) Now you can start writing
Don’t forget to connect with readers, use the audience persona we have created in the first step.
Once you’re done don’t forget to proofread by free tools like Grammarly. Readers like short paragraphs instead of lengthy paragraphs.
Don’t publish it yet.
How can I forget the basic SEO? (Beginner guide of SEO is here)
Part 6: Optimize Blog Posts for SEO:
SEO is a comprehensive concept, and you can continuously learn its various types (On-Page SEO, OFF Page SEO, Link Building, etc) throughout your blogging journey.
To keep this post beginner-friendly, I’d like to share a quick checklist that can help you make your written content On-Page SEO-friendly.

You need to optimize these On-Page SEO elements once you finish writing & proofreading part:
1.) Create Attention-Grabbing SEO Titles – A Must-Have
The SEO title is the website title you see on the Google search result page. You can use the power words to make it engaging.
2.) Keep the URL short and must include the primary keyword
3.) Include a keyword in the SEO meta description
4.) Use Only One H1 Tag on Each Page for the Main Headline
5.) Include Target Keywords and Related Terms in H2 and H3 Tags
6.) Connect multiple blog posts by interlinking them
7.) Add Primary Keywords in the First and Last 100 Words of Your Content
8.) Make sure to include your main keywords in the images as well as their alt tags
Once you have done these basic tasks, your first post is ready to publish.
To publish it, please tap on the blue publish right corner button situated at the WordPress dashboard.
(Please check this guide if you feel difficulty in using WordPress editor and if you have any other options)
Step 7: Blog Promotion Can’t be Ignored
The content writing is done. You’ll probably be getting readers from Google (SEO) anytime soon.
SEO is the most popular traffic channel, But there are more traffic channels where you can promote your blog and get readers to land.
- Social Media
- Comment on other blogs
- Guest blogging on Medium, Quora, & Linkedin
- Online communities and niche specific forums
- Email marketing
- Interview with other people and get your blog featured

I don’t think you should focus on any promotion methods other than social media platforms (Instagram, Pinterest, TikTok, or YouTube) in the beginning.
However, you shouldn’t try to explore all social channels at once.
Instead, focus only on the platforms where your target audience is most active.
The best way to figure this out is by analyzing your competitors’ social media channels.
Once you’ve identified the right social platform for your blog, start repurposing your blog content for that platform.
Don’t shy away from creating videos if needed, short videos and reels are currently trending. You can use them to promote your blog in different ways and redirect traffic to your website.
There’s also a book called “500 Social Media Marketing Tips” by Andrew Macarthy” that can help you learn how to effectively set up social media accounts, determine the type of content that performs best on each platform, and build a solid social media strategy.
I’m not promoting the book, but I’ve read it personally and found it very helpful, so I’m just sharing it with you.
Step 8: Make Money with a Blog
99% of the bloggers aim to earn passive income from blogging.
So how can you do it? These are possible blog monetization methods:
| Income Stream | Effort Level | Profit Potential | Best Time to Start |
|---|---|---|---|
| Affiliate Marketing | Low | High | Day 1 |
| Display Ads | Low | Medium | After 10k monthly visits |
| Digital Products | High | Very High | After 6 months |
| Coaching/Consulting | Medium | High | Once you are an “Expert” |
Well, 90% of the bloggers (including us) choose affiliate marketing as their top monetization choice.
The blog BloggersPassion, which you’re currently reading, generates over $15k every month.

You can find detailed information on our income reports from here.

1. Making Money Through Affiliate Products:
Majority of the income which is generated by our blog BloggersPassion comes from selling affiliate products. So our monetization strategy mostly revolves around selling affiliate products.
That’s why we rely heavily on SEO and organic traffic as it converts really better when compared to other traffic channels like social media or referrals.
Basically, affiliate marketing is all about selling other products for commission where you’ll get paid whenever you make a successful affiliate sale which is generated through your affiliate referral links.
If you’re looking to create a monetization strategy using affiliate marketing, you should create contents which educate your audience (and you should also target commercial keywords).
Here are few content types which work well with this model;
- Case studies
- Affiliate marketing product reviews
- Comparison posts
- Discounts and promo codes
Simply search this query on google: “Your Blog Idea” AND Affiliate Program. Example: “Pet AND Affiliate Program”. Once you do google will automatically show you the affiliate programs available.
2. AdSense is popular but you need a lot of traffic!
Just like YouTube shows ads in videos through AdSense to pay creators, AdSense can also display ads on your blog to generate income.
However, to earn a good amount of money, you need significant traffic on your blog. Plus getting an AdSense approval account is also a typical process.
Earnings also heavily depend on the location of your audience. For instance, if your blog gets 1 million visitors from the USA, your earnings will be much higher compared to traffic from Asian countries.
3. Making Money by Selling Your own Products
There’s also another fantastic monetization strategy you can use apart from affiliate marketing. It is selling your own products.
It can range from anything including;
- Selling your own merchandise
- Selling your own stuff such as eBooks, plugins, tools
- Selling online courses
- And the list goes on
The best examples of such blogs which are already using this type of monetization strategy include;
- I Will Teach You To Be Rich
- Smart Passive Income
- NeilPatel
The above blogs make millions of dollars by selling products. If you want to use this type of monetization strategy then the following type of content performs well.
- Create in-depth articles around the products you want to create
- Highly educational stuff
- Problem solving contents
- And so on
4. Making Money From Consulting
You can also offer consulting, private mentorships or 1 on 1 consulting services from your blogs as it’s another great monetization strategy.
The key to making more money from this kind of monetization strategy is that you need to focus on increasing your personal brand. You should establish yourself as an expert or thought leader in your industry.
Conclusion: Next 30-Day Plan for New Bloggers
Blogging in 2026 is no longer about being a “writer”.
It’s about being a trusted guide in a world of AI noise.
Here is your “Go-Live” checklist for the next 4 weeks:
- Week 1: Pick a micro-niche and buy your .com domain.
- Week 2: Set up WordPress on a fast host (like Hostinger) and install a clean theme (like GeneratePress).
- Week 3: Write your first 3 “Experience-Led” posts (Pillar content).
- Week 4: Create one “Lead Magnet” (checklist) to start your email list and share your posts on Reddit/Social Media.
FAQs:
What is Blogging?
Blogging is the process of communicating with an audience by creating and publishing content on a blog website.
How much starting a blog costs in 2026?
To start a blog, you’ll need at least hosting and a domain name, which won’t cost you more than $50 (₹4500) per year.
What should I blog about?
Choose a topic that you have a knowledge or deep interest in, otherwise you’ll be demotivated by writing a couple of blogs.
How do I drive traffic to my blog?
The best way to drive traffic to your blog is through search engines (SEO). Additionally, you can promote your content on social media, public forums like Quora and Reddit to attract more visitors.
How do beginner bloggers make money?
Affiliate marketing, AdSense, Selling own products, Selling courses & memberships are some of the popular ways to make passive income from blogging.
Do I need technical skills to start a blog?
No, if you use the WordPress blogging platform, you likely won’t need coding or advanced technical skills during your blogging journey.
How much money can you make from a blog?
Based on a survey conducted on 1500 bloggers, 9% of bloggers make around $1,000 to $10,000 a month and 4% make more than $10,000 a month while most of them make less than $3.50 per day.

Not so easy to get success in blogging, As it's not only about writing but about serving in-depth and solution oriented content to the set of people and it's involves a lot of research as there are more competitors out there.
After reading your content it seems that you have a long years of experience and in the right direction you have elaborated each steps that is really magnificent and going to help newbies a lot.
Got to learn real practical steps through your article, thanks for sharing.